使用 VuePress + GitHub Pages + GitHub Actions 搭建个人博客
本文主要介绍使用 VuePress + GibHub Pages 搭建个人博客,并使用 GibHub Actions 实现博客自动化部署的详细步骤。
# 新建代码仓库
登录 GitHub,新建一个代码仓库,仓库名称为 xxx.github.io,xxx 为你的 GitHub 账号名。
为什么这么命名?因为部署到 GitHub Pages 后,通过仓库名称(例如:https://songjian-99.github.io/ (opens new window))就可以访问到网站。如果是其他的仓库名称,那么访问的域名就是 https://songjian-99.github.io/xxx (opens new window),访问的域名会自动加上 xxx.github.io 作为中间的一层路径。(同时项目中 config.js 文件中的 base 属性也要对应上)
新增一个代码分支,名称为 gh-pages(workflow 配置文件中会使用)。
master 分支:存放项目源码
gh-pages 分支:存放 VuePress 生成的静态文件
# VuePress
本文只提供 VuePress 的基础使用和简单配置,不会深度介绍 VuePress 的各个功能点。如果要深入使用,可以自行查看官方文档。
推荐使用其他主题来丰富 VuePress 的功能。
# 项目初始化
在本地创建一个新的目录并关联上 GitHub 仓库,在该目录下执行以下命令。
npm init    // 初始化项目
npm install -D vuepress // 安装 VuePress 依赖。VuePress 版本为 1.x,需要 Node.js >= 8.6
2
# 配置
参考官方文档目录结构 (opens new window)和基本配置 (opens new window)选项卡,在项目中创建目录并且添加相关配置文件。最终目录结构如下(仅列出项目主要目录)。
—— blog // 根目录
   |—— docs
       |—— .vuepress
           |—— public // 存放静态资源,比如图片
               |-- favicon.ico // 页签图标
               |-- logo.jpg  // 首页logo图片
           |—— config.js // 配置文件
       |—— books // 存放文章
           |-- Java.md
           |-- Vue.md
       |—— README.md // 首页配置文件
  |—— package.json
2
3
4
5
6
7
8
9
10
11
12
- config.js:必要的配置文件,可以配置网站的导航栏、侧边栏、主题和插件等信息。
module.exports = {
   title: 'Cleaner',  // 网站标题
   description: '个人网站',
   head: [ // 注入到当前页面的 HTML <head> 中的标签
     ['link', { rel: 'icon', href: '/favicon.ico' }], // 增加网页标签图标)
  ],
   base: '/',
   themeConfig: {
     nav:[ // 导航栏配置
         {
         text: 'java',
         link: '/java/',
         items: [
           {text: 'JVM', link: '/'},
           {text: '并发编程', link: '/'}
         ]
       },
       {text: '书籍', link: '/books/'}
     ]}
};
2
3
4
5
6
7
8
9
10
11
12
13
14
15
16
17
18
19
20
- README.md:网站的首页配置文件。
home: true
title: 首页
author: Cleaner
data: '2023-6-1'
heroImage: /logo.jpg
heroText: null
tagline: null
actionText: 快速上手 →
actionLink: /
features:
- title: 简洁至上
  details: 以 Markdown 为中心的项目结构,以最少的配置帮助你专注于写作。
- title: Vue驱动
  details: 享受 Vue + webpack 的开发体验,在 Markdown 中使用 Vue 组件,同时可以使用 Vue 来开发自定义主题。
- title: 高性能
  details: VuePress 为每个页面预渲染生成静态的 HTML,同时在页面被加载的时候,将作为 SPA 运行。
footer: MIT Licensed | Copyright © 2018-present Evan You
2
3
4
5
6
7
8
9
10
11
12
13
14
15
16
17
- package.json
{
   "name": "blog",
   "version": "1.0.0",
   "description": "cleaner's blog",
   "main": "index.js",
   "scripts": {
     "dev": "vuepress dev docs --temp .temp",  // 项目运行命令
     "build": "vuepress build docs",
  },
   "author": "Cleaner",
   "license": "ISC",
   "devDependencies": {
     "vue": "^2.7.14",
     "vuepress": "^1.9.9"
  }
}
2
3
4
5
6
7
8
9
10
11
12
13
14
15
16
# 运行
执行命令npm run dev运行项目。浏览器访问 localhost:8080,界面展示如下。至此本地搭建 VuePress 项目完成。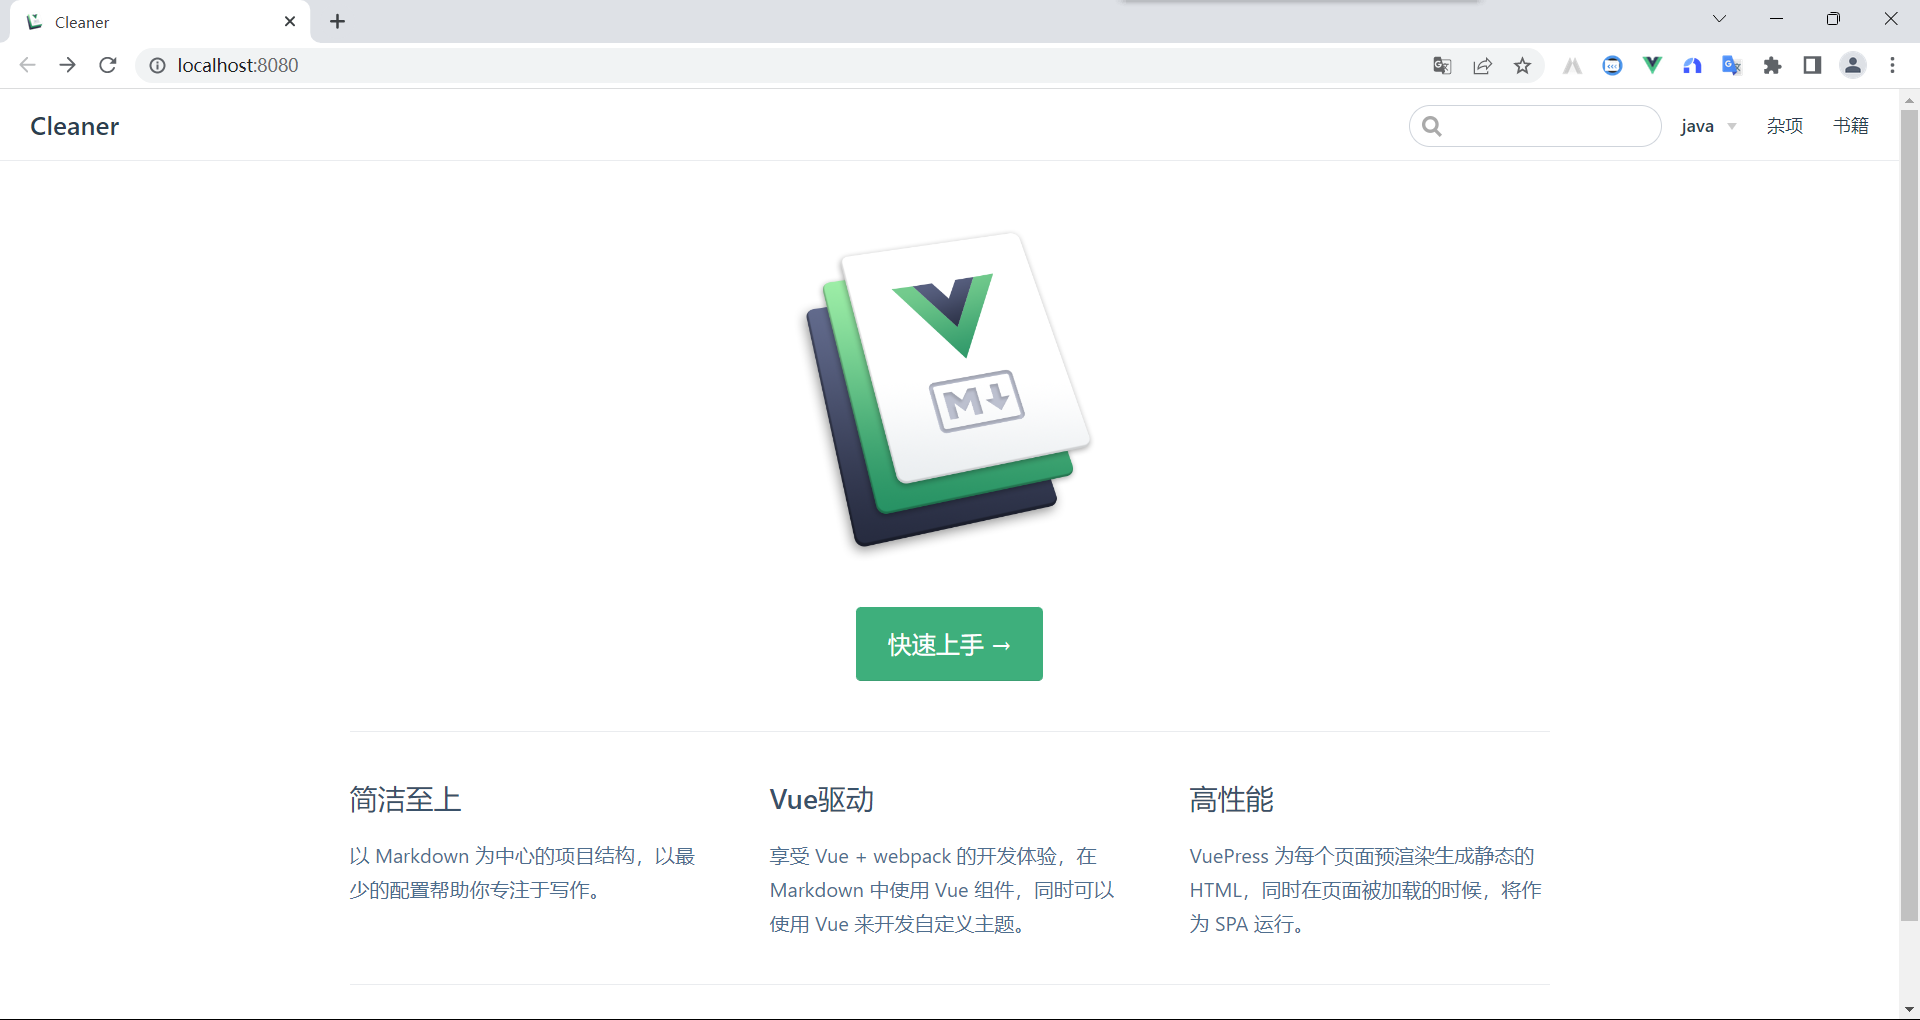
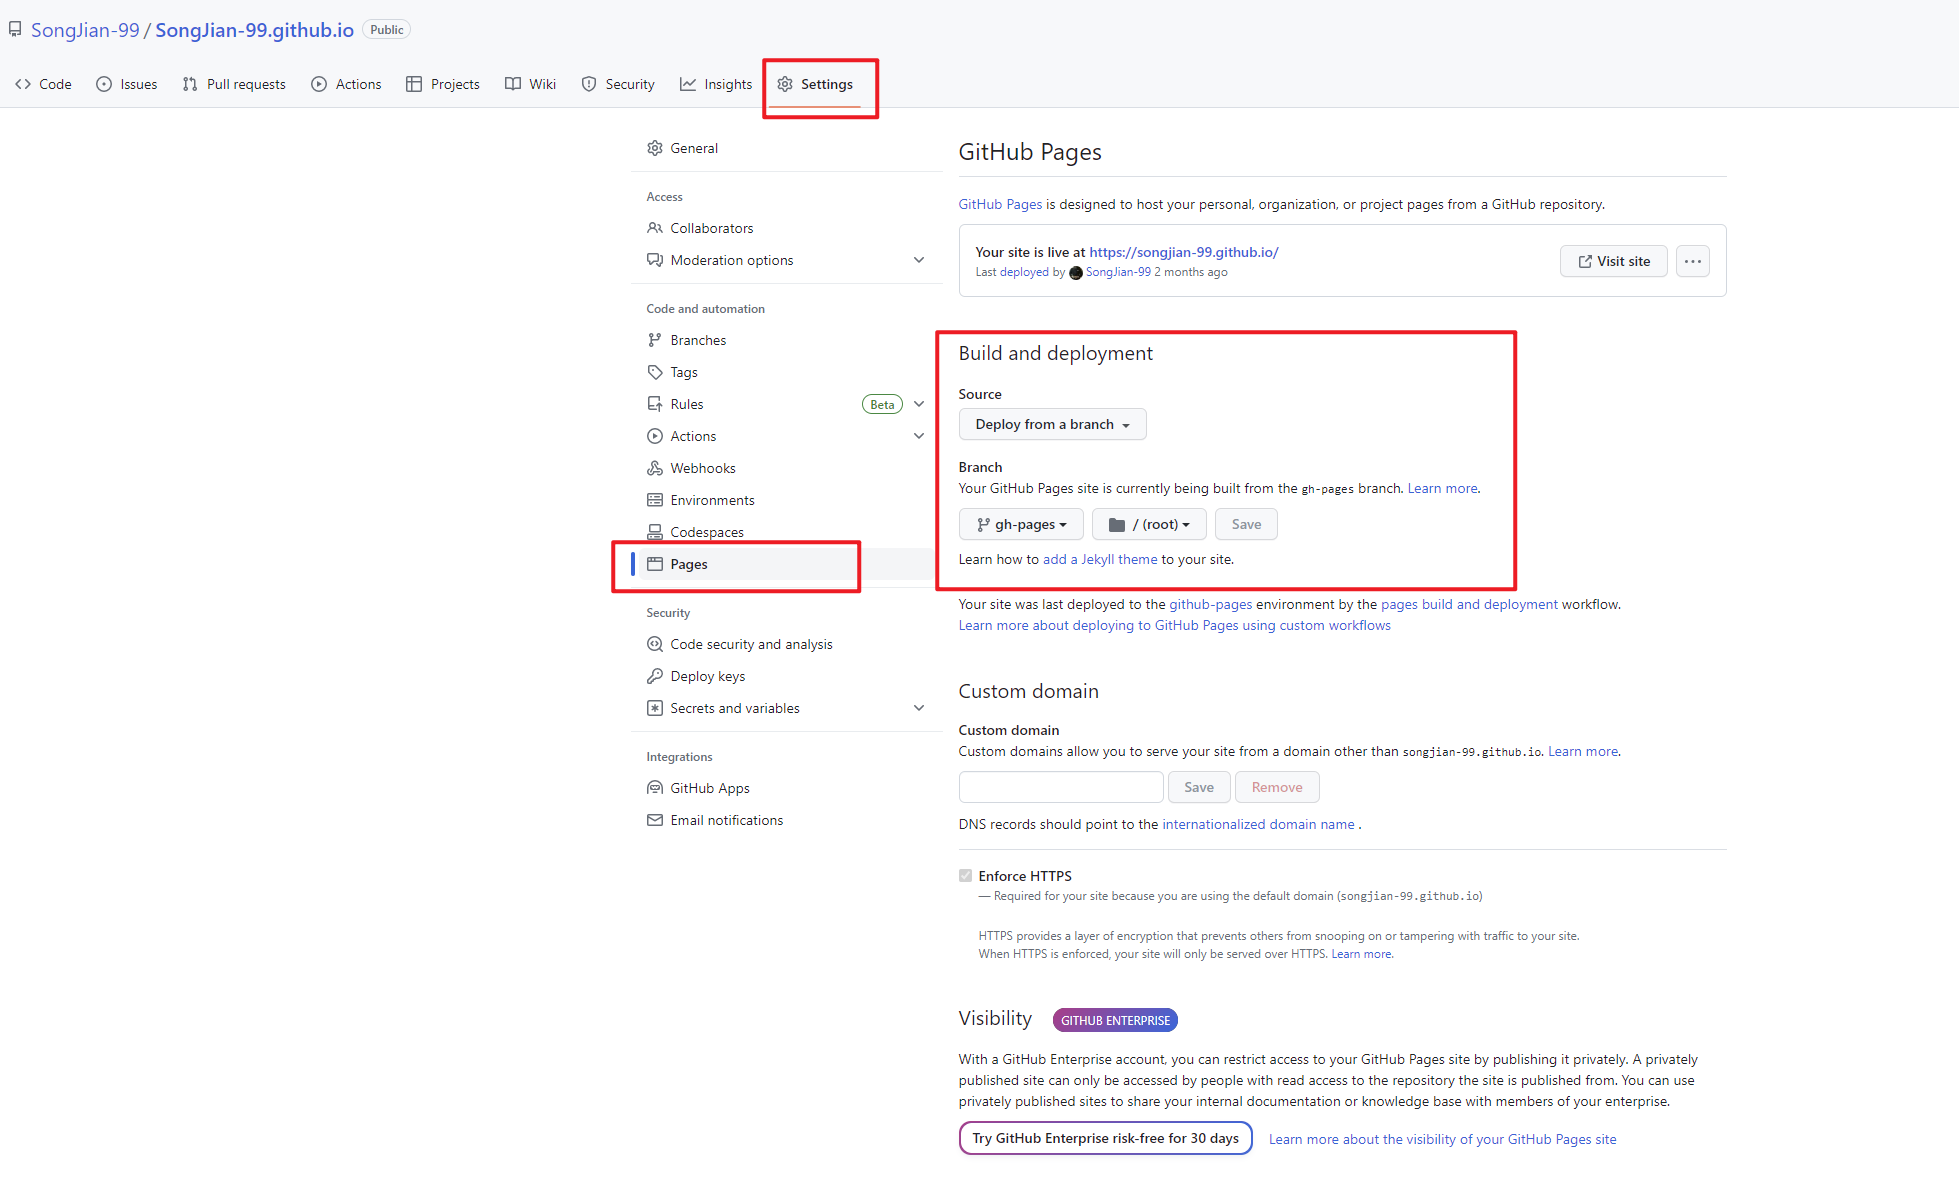
# GitHub Pages
进入仓库页面,点击 Settings,选择 Pages 选项卡,在 Build and deployment 下选择 gh-pages 分支,然后点击 save 即可。
# GitHub Actions
# 新增 Access Token
- 点击用户头像,选择 Settings,进入用户设置面板,然后选择 Developer settings 选项卡(选项卡列表最下面),展开 Personal access tokens 选项卡,点击 Tokens(classic)。
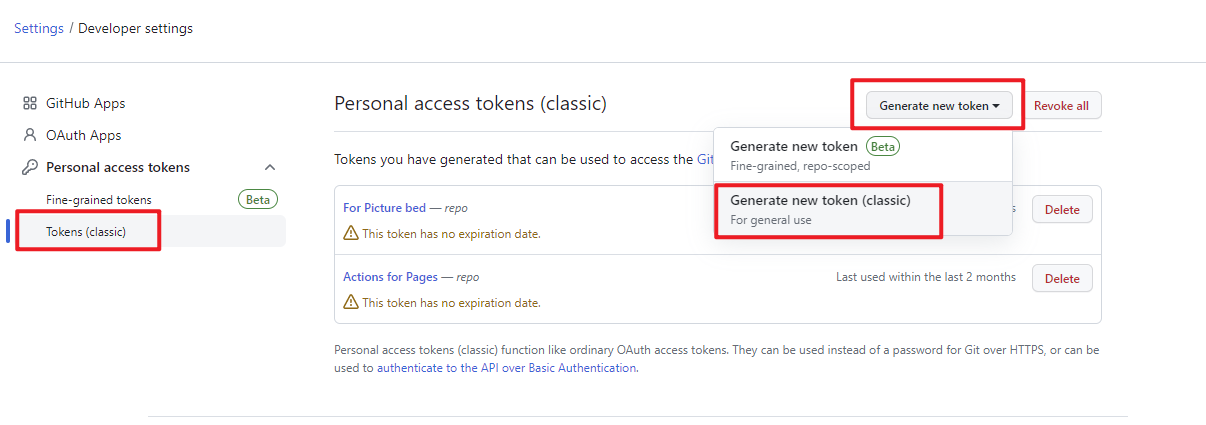
- 点击 Generate new token。Note:描述该 token 用来做什么,可以随便填写,有意义即可;Expiration:选择 token 的过期时间;Select Scopes:选择 token 的使用范围,至少要勾选上 repo,否则这个 token 没有仓库权限,自动部署会失败。然后点击生成 token。将 token 复制下来,下一步会使用。
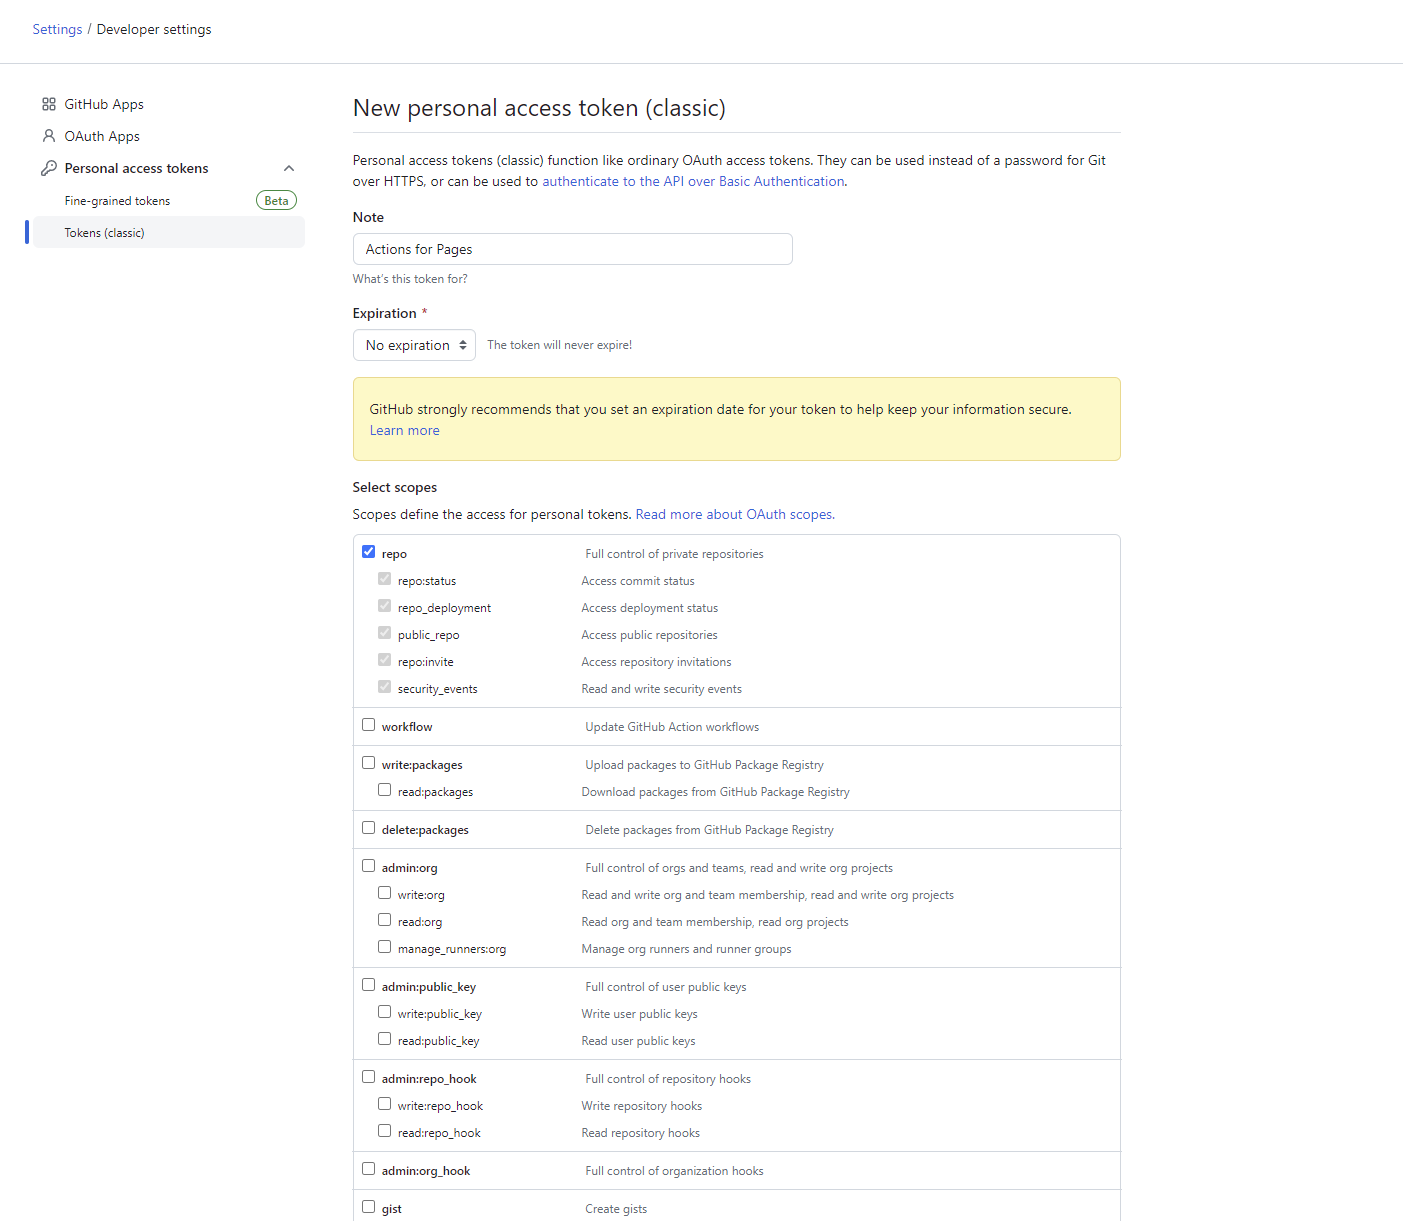
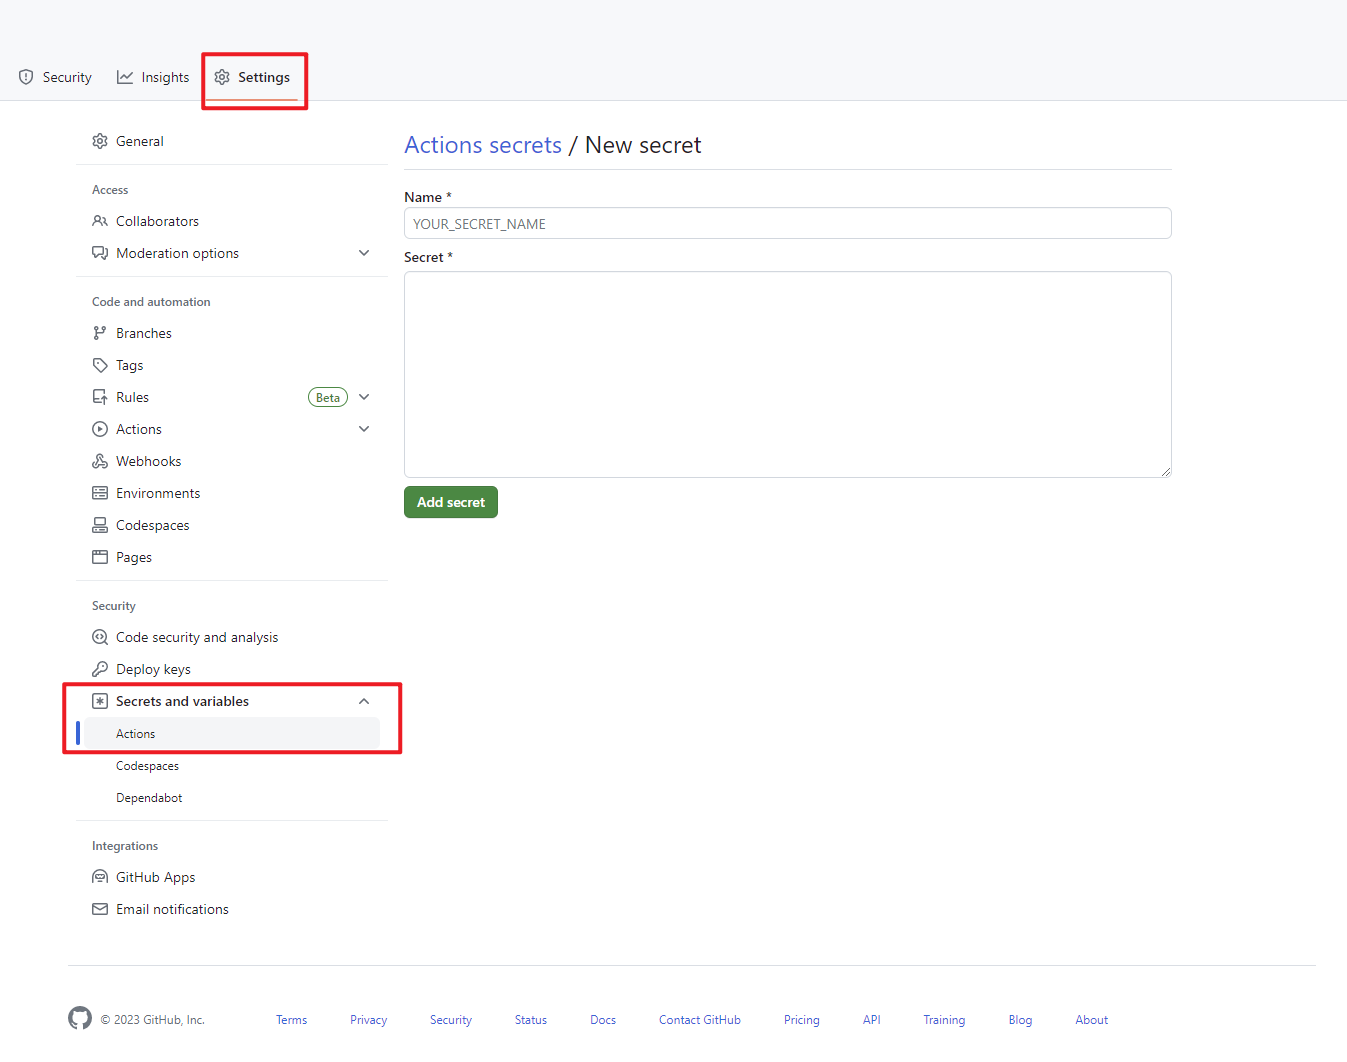
# 创建 Secrets
返回到仓库页面,点击 Settings,选择 Secrets and variables 选项卡,选择 Actions 选项,点击 New repository secret,新增一个 Secret,名称为 ACCESS_TOKEN,值就是上一步生成的 token 值。将名称复制下来,下一步会用到。
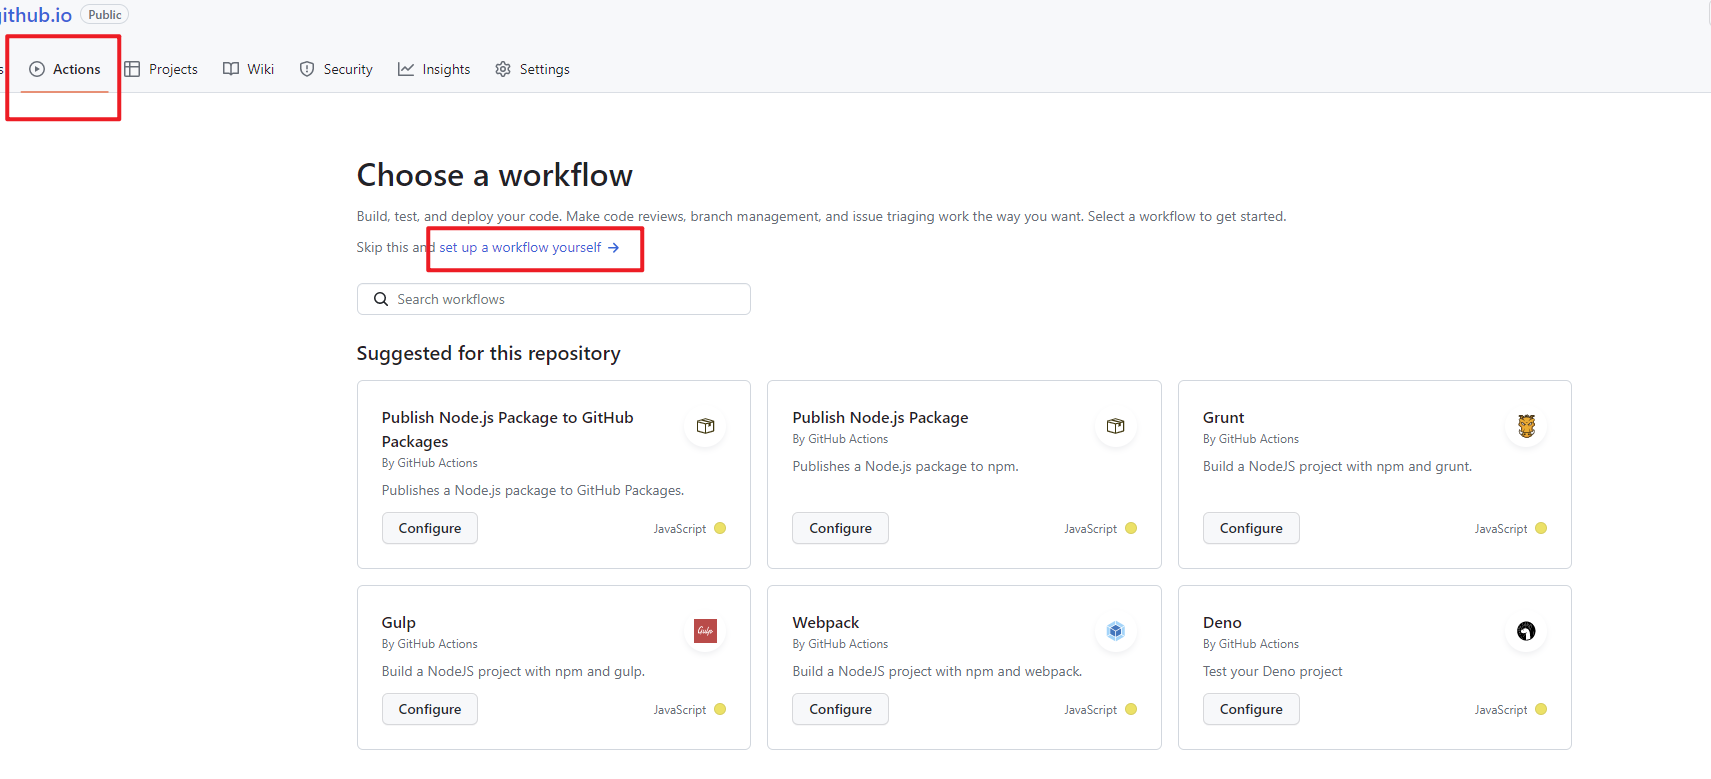
# 创建任务文件
返回到仓库页面,点击 Actions,点击 New workflow,然后点击 set up a workflow yourself。
Workflow 配置文件:main.yml
# workflow 名称,可以自定义
name: Deploy GitHub Pages
# 触发条件:在代码 push 到 master 分支后,自动执行该 workflow
on:
push:
branches:
- master
# 任务
jobs:
build-and-deploy:
# 服务器环境:最新版 Ubuntu,也可以自定义版本
runs-on: ubuntu-latest
steps:
# 拉取代码
- name: Checkout
uses: actions/checkout@v2
with:
fetch-depth: 0
# 设置 Node.js 版本
- name: Setup Node.js environment
uses: actions/setup-node@v1
with:
node-version: "14.18.0"
# 缓存 node_modules
- name: Cache dependencies
uses: actions/cache@v2
id: yarn-cache
with:
path: |
**/node_modules
key: ${{ runner.os }}-yarn-${{ hashFiles('**/yarn.lock') }}
restore-keys: |
${{ runner.os }}-yarn-
# 如果缓存没有命中,安装依赖
- name: Install dependencies
if: steps.yarn-cache.outputs.cache-hit != 'true'
run: yarn --frozen-lockfile
# 生成静态文件
- name: Build
run: npm run build
# 部署到 GitHub Pages
- name: Deploy
uses: crazy-max/ghaction-github-pages@v2
env:
GITHUB_TOKEN: ${{ secrets.ACCESS_TOKEN }} # ACCESS_TOKEN 是创建的 Secret 名称,替换为你自己创建的名称
with:
target-branch: gh-pages # 部署到 gh-pages 分支,master 分支存放的是项目源码,而 gh-pages 分支则用来存放生成的静态文件
build_dir: docs/.vuepress/dist # vuepress 生成的静态文件存放的地方
2
3
4
5
6
7
8
9
10
11
12
13
14
15
16
17
18
19
20
21
22
23
24
25
26
27
28
29
30
31
32
33
34
35
36
37
38
39
40
41
42
43
44
45
46
47
48
49
50
51
52
53
54
55
# 验证
所有步骤配置完成,我们只需将项目代码 push 到仓库中,workflow 就会自动运行,按照配置文件中的步骤依次执行命令,最终将项目编译后的静态文件部署到 gh-pages 分支上。可以在 Actions 中查看运行情况。运行成功后,即可通过域名访问页面。
# 问题
Vue Press 不能热更新,每次项目文件改动后,都需要重新启动。 解决:将 package.json 文件中运行项目的命令改为
"docs:dev": "vuepress dev docs --temp .temp"。Actions workflow 自动执行的时候,因为有很多个步骤,比较容易发生错误。
每次执行失败的时候,定位下哪个步骤出现错误,看一下错误信息,然后再针对性修改。大致的修改方向:首先确保创建 access token 和 secret 这两个步骤没问题(这两个步骤有问题会出现仓库无权限 403,push 代码失败的错误),并且确保名称和 workflow 的配置文件相对应。
workflow 配置文件可以自行调整,官方提供的和其他博客中的配置文件各种各样,这种不行就换另一种试试。
crazy-max/ghaction-github-pages@v2完整配置参数地址:https://github.com/crazy-max/ghaction-github-pages (opens new window)